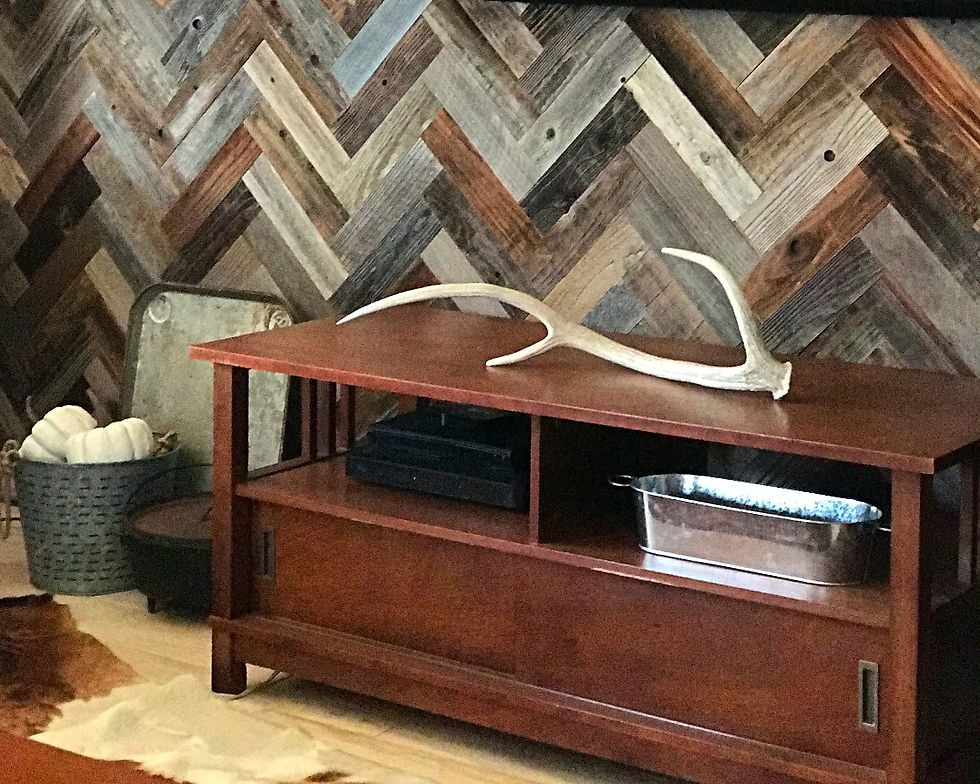
DIY: Reclaimed Wood Wall in Herringbone Pattern
NOTE: This post is sponsored in part by Plank and Mill. See disclaimer info* at the bottom of this post.

I've been wanting to turn our second living area which we call the Game Room into a place that is more hip, inviting and kid-friendly. It was basically a room that held all of our old living room furniture and decor. It needed something... Here is the 'before' picture of the room. It wasn't bad, but it wasn't exactly a space that the kids felt like was 'theirs'.

So I thought, "What about a statement wall"?
A wood wall would be a great option but I'm absolutely NOT a carpenter or the least bit handy. As a matter of fact, I've never even used a nail gun nor do we own one! I had seen advertisements from Plank and Mill, a company that makes a real reclaimed wood wall product that is PEEL and STICK! I was so excited at the possibility.
Plank and Mill has several different styles of wall boards to choose from. They have a reclaimed barn wood mixture with various tones and styles of planks and also a whitewashed barn wood version. You can then install them in a traditional horizontal plank design or herringbone.
I decided I'd go for the herringbone pattern but I knew that would likely require some extra work on the edges of the wall. I would have to cut the boards at a 45 degree angle to achieve the straight line where the walls came together. I decided to enlist Papa, my father-in-law to help me cut any necessary boards (and to measure things....I'm notoriously inaccurate with measuring too).
To begin the project we started by measuring to find the center of the wall and used a level to draw a horizontal and vertical line. That wasn't too hard, especially with Papa's gigantic level! (Note: We did end up removing the television wall mount).


Then we began sticking the 12" pieces in the herringbone pattern according to the directions we were given in the box. (The other wood products have longer boards, herringbone is 'special' so the boards are only 12 inches long). We also were careful to use the 45 degree angle they included with the planks to keep the boards at this precise angle. We realized throughout the project how important this step is to staying on track.

And so the peeling and sticking continued...


Once the planks got closer to the edges of the wall we had to cut the wood. This can be done manually with a simple hand saw or even more easily and quickly with a miter saw. Papa brought his fancy miter saw, but trust me I did not attempt using it!


I will tell you that the edges were the most difficult. By the time we got to the bottom, I literally laid on the floor half of the day measuring and marking where the cuts should go for Papa and sticking the planks when he'd give them to me after being cut.


Finally the main part of our wall was complete!

But...if you look closely at the photo above you'll see that we just couldn't get our angles perfect around the edges. We decided we should frame the wall with 1x2 cedar trim. So we measured the edges and cut the trim to fit. We decided that a weathered gray would be the perfect color for the trim. I originally painted the trim with Verathane's Weathered Gray stain but it ended up being too bright gray. I added some Minwax Expresso stain and mixed them together and achieved a nice rustic gray. Then I sanded the pieces to 'rough them up' a little.


Next my husband helped me hang the trim using a pin nail gun and an air compressor. (For inexperienced carpenters like us, you can rent these tools at your local Home Depot.) I was actually surprised at how easy the nail gun was to use.
We also noticed a few of the boards were starting to peel back just a bit and stick out, so we used the pin nail gun to secure those pieces.


I was so excited to complete the wall and move the furniture back and make the room complete with a little new decor. I lucked out and found some more trendy pillows on clearance at Target and also scored a cowhide rug second hand on Offer Up.


I absolutely LOVE the variation in color and texture of the planks. They are truly all different; some of them have nail holes, knot holes, or unique natural staining. But even more than the look, I'm most excited that my kids seem to love the space. My daughter even said, "This is my new favorite room of the house!". That made the hard work so worth it! (The project ended up taking us around four work days, but our wall was rather large and the herringbone pattern is more complex than a more traditional horizontally planked wood wall.) Thank you Plank and Mill for an amazing product!


*The owner(s) of this blog is compensated to provide opinion on products, services, websites and various other topics. Even though the owner(s) of this blog receives compensation for our posts or advertisements, we always give our honest opinions, findings, beliefs, or experiences on those topics or products. The views and opinions expressed on this blog are purely the bloggers’ own. Any product claim, statistic, quote or other representation about a product or service should be verified with the manufacturer, provider or party in question.


